How to add margin to HTML tags? Complete Guide

A website UI design is primarily about layouts, and setting a balanced margin can help your website visually stand out in the crowd. This article explains how to add margin to HTML tags.
Introduction
Margins in CSS are used to elegantly organize our HTML elements by creating a visual balance of spacing thus making our UI look cleaner. The best analogy to understand margin could be the vertical left space we used to have in our notebooks before starting the content.
What is Margin in CSS?
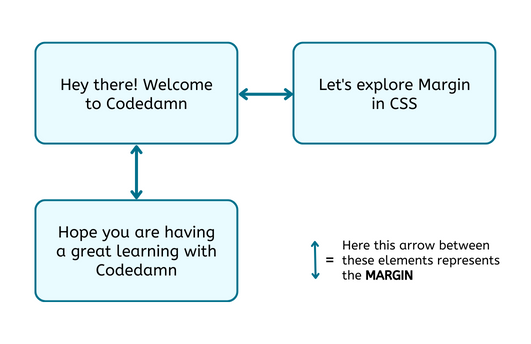
Margin is a CSS property used to add space around the HTML tags or add margin to HTML tags. In simple language margin in CSS is the transparent space around the HTML elements outside the defined borders of the specified elements. It is the outermost portion of the CSS box model and is used to clear out the space around the HTML element.
Syntax
Margin in CSS is applied by using the margin property name and its value. The margin in CSS has the following properties:
- margin-top
- margin-right
- margin-bottom
- margin-left
The CSS margin is applied in the following way:
margin-right: value;Code language: CSS (css)Values of Margin Property in CSS
The margin properties can have the following value:
- length – This accepts margin values in px, pt, cm, em, rem, etc.
- percentage – This specifies the value of margin in % with respect to the width of its parent element.
- keyword: You can also specify some keywords as a margin value. Some of the most commonly used keywords are as follows:
- auto – This value is automatically calculated by the browser based on the available space.
- inherit – This specifies that the margin value is inherited from its parent element.
NOTE: By default the value of the margin is auto.
CSS Margin Constituent Properties
There are four margin properties in CSS. Each individual property is used to set the margin space on a particular side of an HTML element. The following are the constituent properties of margin in CSS:
- margin-top: Used to add a margin on the top of the HTML element.
- margin-right: Used to add a margin on the right side of the HTML element.
- margin-bottom: Used to add a margin on the bottom side of the HTML element.
- margin-left: Used to add a margin on the left side of the HTML element.
Let us see an example of all these constituent margin properties:
.myDiv{
   margin-top: 10px;
   margin-right: 20px;
   margin-bottom: 10px;
   margin-left: 20px;
}Code language: CSS (css)
CSS Margin Shorthand Property
Margin shorthand property simply means a short way of assigning all the margin values in a single line of code or a within a single declaration. Shorthand property serves the same purpose as defining individual margin constituent properties does but the only difference is that shorthand margin property looks short and crisp, and helps us save some extra lines of code thus making our code look shorter & cleaner.
The different CSS margin shorthand property notations are as follows:
Single Value
This notation is used the set the same margin value from all sides.
.myDiv{
   margin: 10px;
}Code language: CSS (css)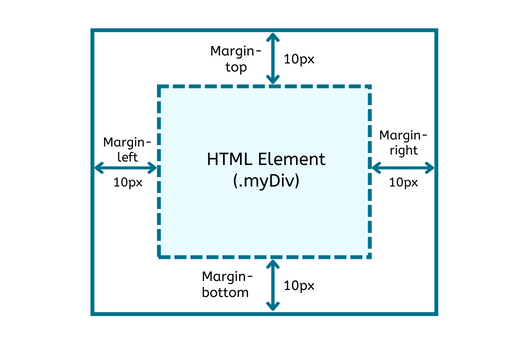
Two Values
This notation has two values where first value defines the vertical margin (i.e margin-top & margin-bottom) and the second value defined the horizontal margin (i.e margin-right & margin-left).
.myDiv{
   margin: 10px 25px;
}Code language: CSS (css)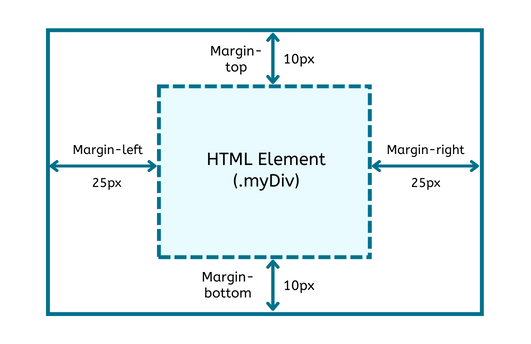
Three Values
This notation has three values where the first value defines the top margin, the second defines the horizontal margin (i.e margin-right & margin-left) and the third value defines the bottom margin.
.myDiv{
   margin: 5px 15px 10px;
}Code language: CSS (css)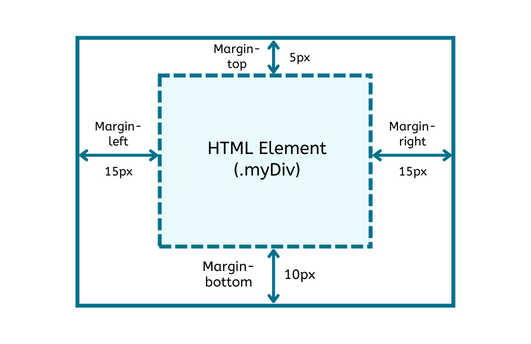
Four Values
This notation has four values that define the margin for all four sides starting from the top of the element and moving clockwise to all the remaining sides.
.myDiv{
   margin: 5px 15px 10px 20px;
}Code language: CSS (css)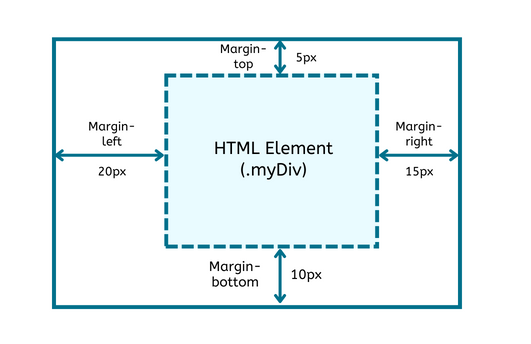
In the above code example, the four margin values are in the order of margin-top, margin-right, margin-bottom, and margin-left respectively.
So now, after understanding the basics of margins in CSS let us dive into some simple yet quite tricky concepts related to margins like collapsing and negative margins.
Collapsing Margins in CSS
Sometimes the vertical margins i.e the margin-top and margin-bottom of the vertical adjacent HTML elements are collapsed into a single margin containing the value which is greater among the two vertically adjacent HTML elements.
To understand this concept better let us take an example.
.divOne {
    margin-bottom: 20px;
}

.divTwo {
    margin-top: 40px;
}Code language: CSS (css)
In the code above we have taken two div with class divOne and divTwo respectively and assigned a margin-bottom of 20px to divOne and a margin-top of 40px to divTwo.
Earlier you would expect the vertical margin between the two divs to be 60px i.e. combined margin of both the div elements i.e 20px + 40px. But now that we know the concept of collapsing margin we know that the actual margin between both the elements is 40px.
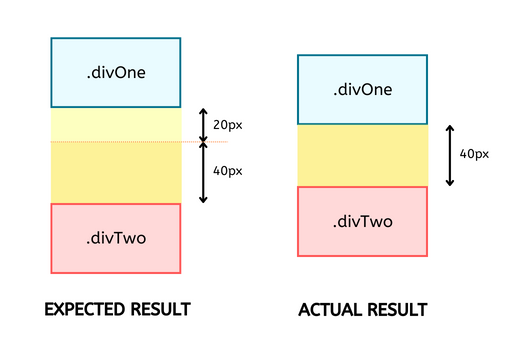
NOTE: Collapsing margins are only possible in vertical margin value (margin-top & margin-bottom) and not in horizontal margin value (margin-left & margin-right)
Negative Margins in CSS
Margin in CSS also accepts negative values. Negative margins are used to reduce the space between two HTML elements or to drag two HTML elements closer to each other.
Negative margins are usually used to overlap the elements. Overlapping occurs when the value of the negative margin is greater than the actual margin between both HTML elements.
Negative values work in a different manner for margin-top and margin-left, and in a different manner for margin-bottom and margin-right. Sounds confusing? Don’t worry we have got you covered.
- Negative values in margin-right or margin-bottom drag the neighbor right or bottom element respectively towards our element
- Negative values in margin-top or margin-left shift our element closer toward its top or left neighbor element respectively.
Note: In the above two points “our element” refers to the targeted element i.e. the element on which the negative margin is applied.
Let us see some examples to understand this better.
.ourElement{
    margin-top: -15px;
}Code language: CSS (css)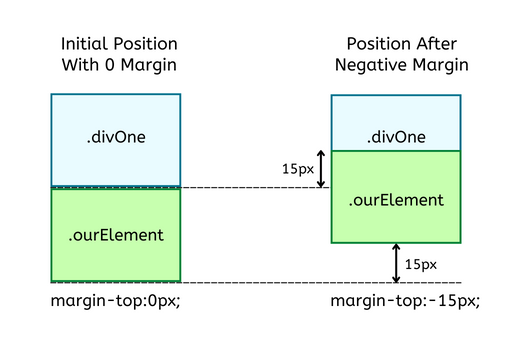
On giving a negative margin-top of 15px to the div with the class name ourElement the browser shifts its 15px upwards from its bottom baseline and hence overlapping its top neighbor.
.ourElement{
    margin-left: -15px;
}Code language: CSS (css)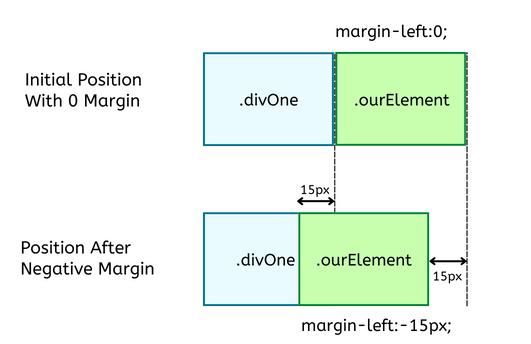
Here on giving a negative margin-left of 15px, the browser shifts our targeted element 15px left from its right baseline and hence overlapping it on its right neighbor.
.ourElement{
    margin-bottom: -15px;
}Code language: CSS (css)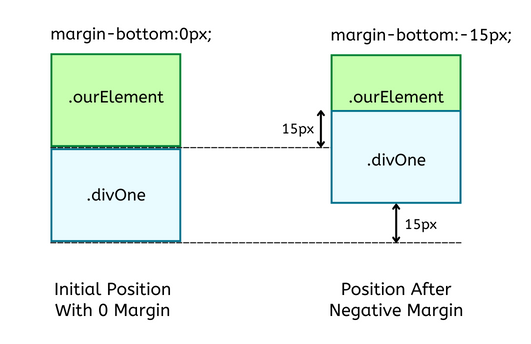
So here the browser calculates the bottom baseline of the neighbor element of the targeted element and shifts the neighboring element 10px upwards and hence overlaps the targeted element.
.ourElement{
    margin-right: -15px;
}Code language: CSS (css)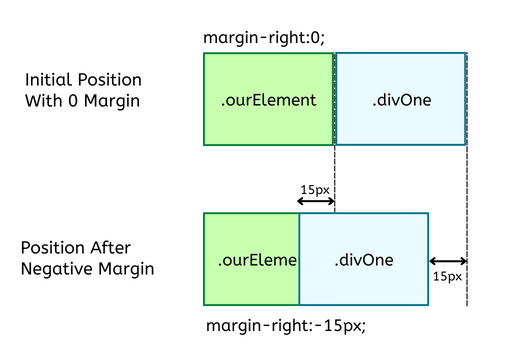
Here the browser calculates the right baseline of the neighbor element of the targeted element and shifts the neighboring element 10px toward the left and hence overlaps the targeted element.
Conclusion
So to conclude margin in CSS is the transparent space defined outside the border of the element which is used to clear out the space around the HTML elements.
In this article, we covered how to add margin to HTML tags from the very beginning and also covered some advanced concepts related to margin. Hope you enjoyed reading this article. Stay tuned for more such articles.
Sharing is caring
Did you like what Simran Gangwani wrote? Thank them for their work by sharing it on social media.
No comments so far
Curious about this topic? Continue your journey with these coding courses:
![Course thumbnail for Learn Advanced HTML and CSS Concepts [Updated - 2024]](https://wsrv.nl/?url=https%3A%2F%2Fs3.us-east-1.amazonaws.com%2Fcreator-assets.codedamn.com%2Fcodedamn-61897bfe60f1140008feb00d%2FCOURSE_IMAGE%2F2023-02-10%2F3ba89f5a2b34cba18335323dba812a6140e0c887&w=256&q=82&output=webp)
