Tailwind CSS tutorial – Complete guide

Tailwind CSS is an open-source and utility-first CSS framework. Tailwind CSS provides classes to make styling fast and customization on the fly.
Core Fundamentals
Meaning of Utility First
Utility classes means classes that are very low-level and
gives control to completely customize our styling without leaving HTML. This means we can design our HTML within HTML.
Tailwind is not Bootstrap or Materialize

You may have seen the use of styled components in bootstrap or materialize before. This means classes come up with their own styles like some colors, padding, and other styles.
But in the case of Tailwind, it doesn’t come up with pre-styled components. It gives us simple classes which we can style ourselves.
And at the same time let us customize on the fly.
Tailwind Utilities
There are some classes that are provided by Tailwind CSS
to apply various properties like hover, dark mode theme, responsiveness, and many more.
Exploring Tailwind Classes
Installation Process
You want to create a production-grade Project or just a Personal Project that can be little or big. Tailwind Got you.
There are so many ways to install Tailwind according to needs. You can simply spin up a Codedamn Playground or Code Pen.
- Using CDN – You can link a link CDN from Tailwind in<script> tag in your project.
- Tailwind CLI using npm – You can also use npm too to install tailwind in the project.
- For Frameworks – If you are using any Framework then you can check this.
Tailwind in action
Now we will style a button in five ways using Tailwind CSS
<body class="flex gap-x-10 justify-center items-center h-screen bg-gradient-to-br from-pink-500 to-blue-700">
  <button class="px-6 py-2 bg-orange-400 text-gray-100 text-lg font-extrabold">
    Button 1
  </button>

  <button class="border border-2 border-orange-400 px-6 py-2 text-orange-300 text-lg font-extrabold">
    Button 2
  </button>

  <button class="bg-cyan-600 rounded-full px-6 py-2 text-gray-300 text-lg font-extrabold">
    Button 3
  </button>

  <button class="border border-2 border-dotted border-orange-400 rounded-tl-xl rounded-br-xl px-6 py-2 text-orange-300 text-lg font-extrabold">
    Button 4
  </button>

  <button class="bg-[#a2d2ff] text-[18px] rounded-[8px] px-6 py-2 font-extrabold">
    Button 5
  </button>
<script src="https://cdn.tailwindcss.com"></script>
</body>
Code language: HTML, XML (xml)
In this code, there are 5 buttons that are styled differently using Tailwind CSS.
Button 1 – Button with Background Color
- Padding – Tailwind “padding” as “p” and then its value. Here
- “p” means “padding”
- “pl” means “padding-left”
- “pr” means “padding-right”
- “px” means “padding-left” and “padding-right” both at same time. This is what we used here. And then value, here “6” means “1.25rem”
Similar thing with padding on top and bottom
- “pt” means “padding-top”
- “pb” means “padding-bottom”
- “py” means “padding-top” and “padding-bottom” at the same time.
- Background color – we used class “bg” with the “orange” color with the value “300” given by Tailwind CSS. You can find the color list given by Tailwind CSS.
- Font-Size – We can make any text small to large using “text-{value}”. In this code, we used “text-lg”. This means it will apply two properties: “Font-Size” and “Line-Height”.
Classes are “xs” – extra small, “sm” – small, “lg” – large and many more. - Font – Weight – Class to increase or decrease weight of font is “font-{value}”, Here it’s “font-extrabold”.
Other values are “thin”, which means the value is 100, “extralight” which means 200, and semibold, bold, extrabold.
Button 2 – Simple button with border and Border color
- Border – Border class makes a solid, white, and 1px wide border around that HTML element.
- Border-width – To increase the width we can give value after border like a border-{value}. Here it is “2” means “2px”.
- Text-Color – We can change the color of the text
using text-{colorName-value}, here it is “text-orange-300”.
Button 3 – Rounded Button
- We can make rounded buttons. Class for this is “rounded-{value}”. Here it’s “rounded-full”. This means border-radius : {some value};
- Values can be “sm”, “md”, “lg”, “xl” and so on.
Button 4 – Specific Rounded Corner and dotted border
- Specific Rounded Corner – We can target a specific corner of the HTML element too, here it’s <button>. Format is rounded-{corner}-{value}. Like, “rounded-tl-xl”, “rounded-br-xl”, here “tl” means Top-Left and “br” means Bottom-Right.
- Border Style – Border style can be changed with classes
like “dotted”, “dashed”, “doubled” and some other styles. Here, it’s “border-dotted”.
Button 5 – Button with custom values
In Tailwind CSS, we can give custom values to classes
using a “square bracket” that looks something like this [ ].
- Custom Background Color – We can give the custom color value like in Button 5 like “bg-[#hex code]”.
Here it’s bg-[#a2d2ff]. - Custom Font Size – We can give custom font sizes in “px”, “rem”, “vw” and others in a similar format as above.
Here we wrote text-[18px]. - Custom Rounded Value – We can give custom values while making rounded corners. Here it’s rounded-[8px].
Now in the end we will end up with something like this. And here is the Complete Code Pen.

Gradients
Tailwind allows us to make gradients very easily and creatively,
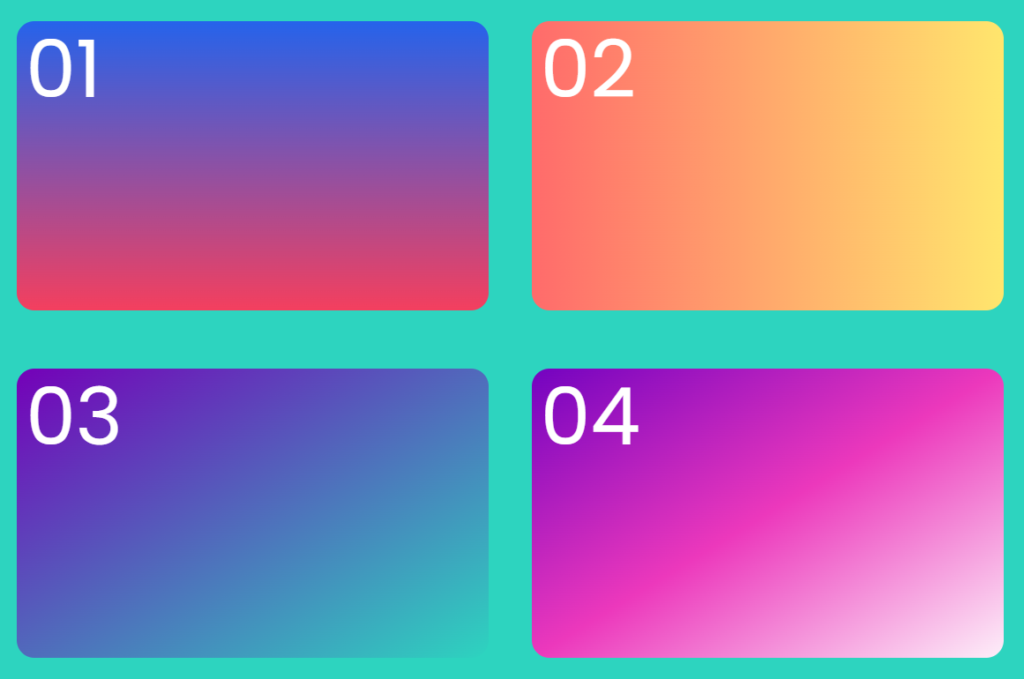
Now we will look into making gradients.
<body class="flex justify-center items-center h-screen bg-teal-400">
  <div class="grid grid-cols-2 grid-rows-2 justify-items-center place-items-center place-content-center w-full h-full">

    <div class="bg-gradient-to-t from-rose-500 to-blue-600 rounded-2xl w-11/12 h-5/6 text-7xl p-2 text-white">
      01
    </div>
    <div class="bg-gradient-to-r from-[#ff6b6b] to-[#ffe66d] rounded-2xl w-11/12 h-5/6 text-7xl p-2 text-white">
      02
    </div>
    <div class="bg-gradient-to-br from-[#7400b8] rounded-2xl w-11/12 h-5/6 text-7xl p-2 text-white">
      03
    </div>
    <div class="bg-gradient-to-tl from-[#fdeff9] via-[#ec38bc] to-[#7303c0] rounded-2xl w-11/12 h-5/6 text-7xl p-2 text-white">
      04
    </div>
  </div>

<script src="https://cdn.tailwindcss.com"></script>
</body>
Code language: HTML, XML (xml)
In this code, we created four <div> and we applied gradient in different ways.
- DIV 01
To apply gradient class is “bg-gradient-to-{direction of gradient}.- Now “bg” means background,
“gradient” means gradient, “to” refers to a direction, and
direction can be “t” (top), “b” (bottom), “l” (left) and “r” means right. - Here we did “bg-gradient-to-t“
- After that, we need the first and last colors. we use it like this: “bg-gradient-to-t from-rose-500 to-blue-600“
- Now “bg” means background,
- DIV 02 – Using Custom Colors
- In this <div> we changed direction to “r” (right).
- And used two custom colors with [ ].
- So, we end up with this: “bg-gradient-to-r from-[#ff6b6b]“.
- DIV 03 – Color to Fade effect
- In this <div>, we gave a different direction this time. Which is one of “tl” (Top-Let), “tr” (Top-Right), “bl” (Bottom-Right) and “bl” (Bottom-Left).
- We choose “bg-gradient-to-br“.
- To give a Fade Effect we have to set just the color in “from” and leave the “to” part.
- DIV 04 – Making Gradient with three colors
- In this <div>, Direction of gradient is “tl” (Top-Left),
“bg-gradient-to-tl“. - To take input of three colors, we use “via”.
- First Color goes in “from”, the Second color goes in “via” and the Last Color goes in “to”.
Which is “from-[#fdeff9] via-[#ec38bc] to-[#7303c0]“
- In this <div>, Direction of gradient is “tl” (Top-Left),
You can check out the Code Pen here.

There is some much cool stuff possible other than this. It is just the tip of the iceberg.
Tailwind Utilities
Tailwind Configuration
Unlike any other CSS Framework, Tailwind CSS takes
one step further to allow our own customizations in a structured manner.
By creating a separate file “tailwind.config.js”. We can put our customization in this file.
module.exports = {
  content: ['./src/**/*.{html,js}'],
  theme: {
    colors: {
      'orange': '#ff7849',
      'gray-dark': '#273444',
      'gray': '#8492a6',
    },
    fontFamily: {
      sans: ['Graphik', 'sans-serif'],
      serif: ['Merriweather', 'serif'],
    },
    extend: {
      spacing: {
        '8xl': '96rem',
        '9xl': '128rem',
      },
      borderRadius: {
        '4xl': '2rem',
      }
    }
  },
}
Code language: JavaScript (javascript)
In the Configuration file, there are four things that are a must: content, theme, extend, and plugins.
- Content – Here we specify the path of project files where Tailwind CSS is used for styling purposes.
- Theme – We can store “colors”, and “fontFamily” in this section.
- Extend – We want to follow the same classes given by tailwind but increase the value then we specify it here.
- Plugins – If you want to use any type of plugin then it should be specified here.
Responsiveness
Tailwind by default gives responsive breakpoints.
Because of these breakpoints, there is no need for media queries.
“sm” – 640px
“md” – 767px
“lg” – 1024px
“xl” – 1280px
“2xl” – 1536px
Here is a Code Pen showing Responsiveness in action.
Dark Mode
Many websites are designed with dark versions too. Tailwind helps us achieve this too very efficiently.
module.exports = {
  content: ['./src/**/*.{html,js}'],
  darkMode: 'class',
  theme: {
    extend: {
      spacing: {
    }
  },
}
Code language: JavaScript (javascript)
To apply dark mode, we have to specify it into “tailwind.config.js” along with “extend”. Then after that, we can use it in our HTML.
You can check this to see some applications of Dark Mode.
You can learn in more depth about these and other utilities on Codedamn. In Learn Tailwind CSS 3, they went into the
more practical and specific use of Tailwind with a Real-world Project.
Best Learning Resources
- There is Offical Documentation by Tailwind CSS itself.
- If you want a community that helps you to learn, share and discuss your ideas or project. You should check out Codedamn Course on Tailwind CSS.
Conclusion

- We learned about how to use classes to give padding with “p”, “pl”, “pr” and “px”.
- We looked into how to make borders and border width (border-{value})
- Learnt about different types of border styles (border-{style} and
border color with the syntax of the border-{color-value}. - Adding background color with “bg-{color-value}” and
bg-[custom value] class. - To apply a Gradient we need the direction of the gradient and colors. Colors are inputted in “from”, “via” and “to”.
- At last, Tailwind is awesome but you should know the basics of CSS. Only then it can be more helpful and efficient for your workflow.
Sharing is caring
Did you like what Sunny Shah wrote? Thank them for their work by sharing it on social media.
No comments so far
Curious about this topic? Continue your journey with these coding courses:


