How to create a Python virtual environment?

A Python virtual environment is an environment that allows you to run Python code in isolation from other python code with different specifications and versions. As a result, this can be useful if you want to avoid conflicting dependencies or if you want to test your code on a different Python version. Creating a virtual environment in Python is relatively simple. You can use the built-in venv module or a tool like virtualenv.
What is Python’s virtual environment?
Python digital environments is a remote environment for separate python versions to perform on your computer. What this indicates is that you can have separate digital environments with separate versions of python and python packages for all of your projects. Consequently, you can set up or dispose of python applications in one environment and it’s going to no longer affect some other projects you have.
The applications or libraries installed in every digital environment are found in that virtual environment handiest and no different. Moreover, this virtual environment is break away the documents saved on your foremost computer system.
Why use Python’s virtual environment?
To emphasize there are several advantages to using a virtual environment, some of the notable ones are:
- being able to contain your development environment inside your project, making it remote, and not having it interfere with your system-installed Python or other virtual environments.
- You can also create new virtual environments for different Python versions.
- Another advantage is that you don’t need administrator privileges to download packages in a virtual environment.
- Additionally, it becomes easier to set up your project as an application. A virtual environment makes it easier for developers.
- You can create a list of all the dependencies used in your project, which makes it easy for other developers to install them.
Create a python virtual environment
Setup environment
Install the python virtual environment package.
>>pip3 install virtualenvCode language: Shell Session (shell)create a new directory named “new_project”. And enter that director:
>> cd new_projectCode language: Shell Session (shell)Create virtual environment
In this blog, I will use even to create a virtual environment. However, some python developers additionally use virtualenv to fulfill this task. But from `python v.3.3`, venv has virtualenv functionality built-in.
Create a virtual environment with subsequent commands:
Windows
python -m venv venvCode language: Shell Session (shell)macOS/Linux
python3 -m venv venvCode language: Shell Session (shell)However, in windows, you may write only python but in macOS/Linux you need to specify the python version you are using like python3. Then, -m env is an argument that tells python to run a virtual environment. After all venv at the end is the name of our virtual environment, you may name it by using your choice.
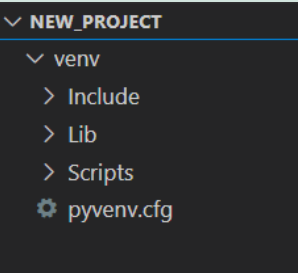
Below is how the folder structure looks after creating venv.

Activate virtual environment
Note: make sure you’re within the same folder where you created the virtual environment (new_project in this example).
Windows
venv\Scripts\activateCode language: Shell Session (shell)macOS/Linux
<code>source venv/bin/activate</code>Code language: Shell Session (shell)If you spot a (venv) for your terminal, your virtual environment is activated correctly.

Install Packages in a venv
Windows
python -m pip install <package-name>Code language: Shell Session (shell)macOS/Linux
python -m pip install <package-name>Code language: Shell Session (shell)Notably, this is the common command to put in applications in a virtual environment. This will set up the package remoted to your virtual environment.
Moreover, in macOS/Linux as we have activated a virtual environment using python3 so we don’t have to use python3 every time. Despite we can use python it instead for further commands, it works the same until the environment is active.
Deactivate virtual environment
Once you’re done with your project or want to get out of the virtual environment by deactivating it.
Windows
deactivateCode language: Shell Session (shell)macOS/Linux
deactivateCode language: Shell Session (shell)Finally, after executing the following command, the (venv) will clear from the terminal and you will exit the virtual environment successfully.
Nevertheless, you can repeat the same steps again if you want to activate the virtual environment again. It will be initiated from the same place it was last deactivated. All your packages will be the same is distinguish without any hassle and version compatibility issues.
Conclusion
Altogether, the Python virtual environment gives us the ability to isolate our Python development projects from our machine’s existing Python installation and any other Python environments. As this gives us complete control over the project environment and makes it easily reproducible and compatible for a longer period.
That’s it for today, Thank You!
Sharing is caring
Did you like what Prabal Gupta wrote? Thank them for their work by sharing it on social media.
No comments so far
Curious about this topic? Continue your journey with these coding courses:

312 students learning
Haris
Python Crash Course for Beginners

111 students learning
Amit Diwan
The Complete Python Course for Beginners